The purpose of these instructions is to get you started using Subversion (aka SVN) on SE's servers. Your instructor should have set up a team account for you.
These instructions are organized as follow:
- Create a shared repository on the SE department's servers
- Connect a TortoiseSVN client to securely connect to the
repository.
- Set up Public Keys
- Checkout a Working Copy
- Step through an everyday workflow with SVN
I. Repository Setup
This part should be done ONCE, by just one team member.- Use PuTTY to SSH to
control.se.rit.eduusing the team account provided by your instructor. - Issue exactly the following commands from the team
account's home directory. In the second command, note that those are
backticks, not single quotes. (To paste text into PuTTY,
use Shift+Insert, or right-click with the mouse)
svnadmin create svn
svn mkdir -m "Creating trunk folder" file://`pwd`/svn/trunk
chmod -R g+rwx,o-rx svn
II. TortoiseSVN Setup
All team members will need to do this part.
We will be connecting to our SVN repository using the Secure Shell (SSH) protocol. The most secure and convenient way of accomplishing this connection with public keys. So first, we will need to set up Windows to connect to our server via SSH public keys.
II.a Set Up Public Keys
If you have already set up a public key with PuTTY, Pageant, andcontrol.se.rit.edu
, just skip this step and use that key.
- Download and install puttygen.exe and pageant.exe (either download them individually, or use the Windows installer)
- With puttygen.exe. Generate a new key. Set a passphrase for
unlocking this key (can be anything you want). Write a useful and
write a useful name in the "Comment" field. Keep this window open.
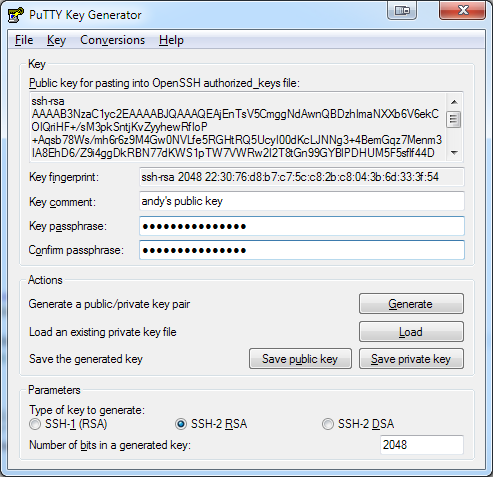
- Save your public key and your private key. Name the files after your computer, like "laptop.pub" and "laptop.ppk". Still keep this window open. (SECURITY NOTE! As the word "private" implies, this ppk file should never be shared with anyone, otherwise they can spoof your entire SE account if they guess the passphrase.)
- Copy the public OpenSSH key in the text box from PuTTYGen.
- Use PuTTY to SSH into
control.se.rit.edu, as yourself (not as your team user). - From the command line, create a folder in your home
directory called
.ssh. The command is:mkdir .ssh
- Now create and edit a file in
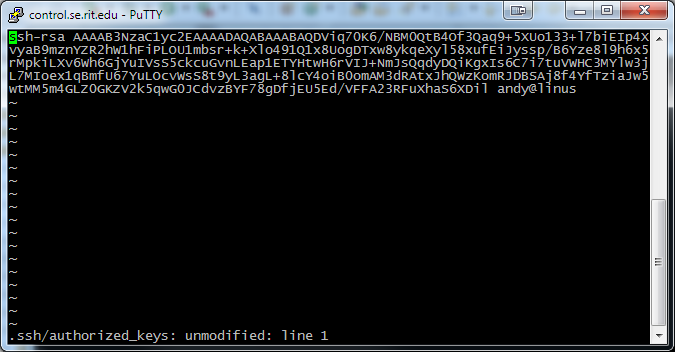
.sshcalledauthorized_keys. Paste that OpenSSH public key into yourauthorized_keys. You will need a command-line text editor to do this. Here's how to do it in vi:vi .ssh/authorized_keys
Then within vi, pressito enter edit mode. HitShift+Insertto paste the public key in. Press ESC, then type:wq(note the colon - this command stands for "write" then "quit").
- Close the PuTTY window and the PuTTYGen window.
- At this point, the control SSH server knows that whomever shows up with a private key matching this public key, control will authenticate them as you. To provide this public key, we need Pageant. (Pageant is the PuTTY SSH Agent.) Run pageant.exe. This is a very lightweight program that shows up in your system tray once you run it.
- Add your key to the agent by right-clicking on the agent
below and adding your key.

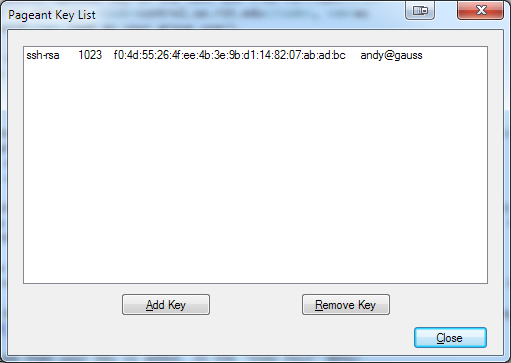
- You can see that your key is added. In the "View Keys" menu:
- Let's test our key. Use PuTTY to sign into
control.se.rit.eduas yourself, only this time, you should not have to enter your password.
II.b Checkout a Working Copy
All team members will need to do this part.
Once you have Pageant running with your key loaded, you'll need to check out a working copy of the repository to your local machine.
- Open up the directory where you want to store the your project.
- Right-click on the directory and click "SVN Checkout"

- When prompted, enter the path to the team repository created
above. The URL looks like this:
svn+ssh://abc1234@control.se.rit.edu/home/teams/610/x610-0yz/svn/trunk
Your URL will differ, however:- abc1234 is your personal SE account
- 610 is the course number
- x610-0yz is your team account (e.g. f610-01a for Fall 610, Section 01, Team A)
- Your checkout window might look something like this. The
defaults are usually okay. Note: If this is a new project, you will
not see any project files. If you have hidden folders turned on, you
may see a
.svnfolder.

III. Basic Workflow with Subversion
- Now let's go through some everyday steps with Subversion.
Let's start by checking in a file. Create a file called
"HelloWorld.txt"

- Once the files is saved, you can move back to the parent
folder and select to commit the changes we just made to the
project. (You may also right click on a specific file to add, then
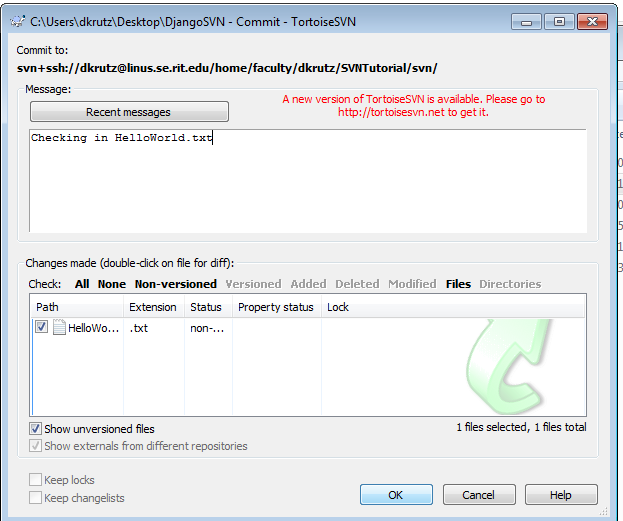
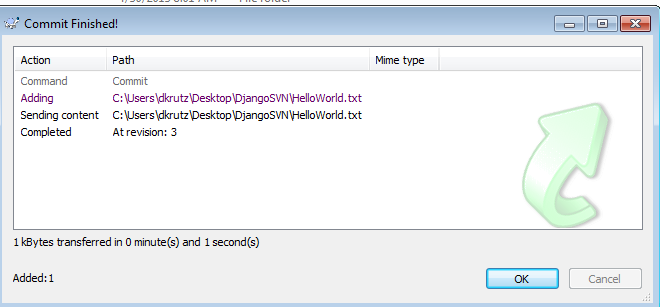
commit). Go to SVN Commit, and type in a useful commit message.

- Have another teammate perform the project creation steps.
- They should retrieve the HelloWorld.txt file.
- The student should then add their own name to the file.
- Save the file.
- Commit those changes back into the repository.
- The next step is to make sure that you can retrieve your teammate's changes. Right-click the directory or file and select "SVN Update"
- You may also view the history of a file or directory and
even revert back to previous versions of a file. One way of doing
this is to right click on the file or directory you wish to examine
and select TortoiseSVN->Repo Browser.
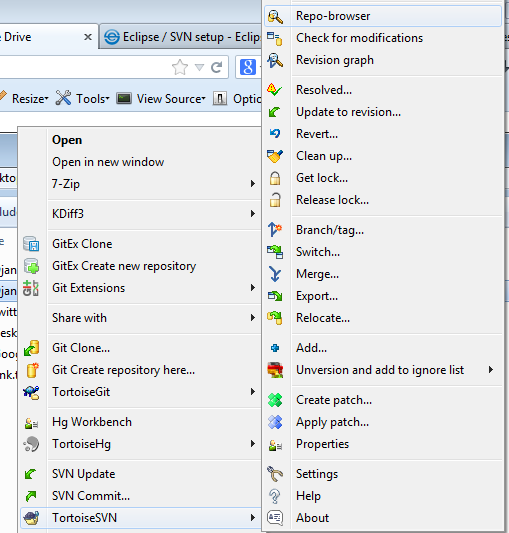
- You may then right click the file you wish to examine and
select one of many options. One is
show log. Doing this will display the history of the file and all commit messages. This is one reason why it is so important to commit files with appropriate messages. Doing so will make a much more informative history viewing experience.

- You should also review external tutorials on Branching & Tagging, and Merging
Helpful Tips
- Your project should contain the following folders:
- trunk
- branches
- tags
- SVN is used for thousands of applications and has been tried and testing millions of times. While no application is perfect, SVN typically will not "eat" or "break" your code.
- The SVN Book is the de facto resource for all things SVN. It is well-written, but verbose.
- Some good SVN practices
- Best branching practices
- While activities such as merging will likely need to be done, sufficient team communication and collaboration will help to eliminate a significant amount of pain for your team. Tip: We recommend that, as a team, you force a merge conflict (i.e. a member changes a file and tries to commit it without updating to the latest). See what happens, and try to resolve it. That way you are not scrambling to read up on merge conflicts before a deadline
- You may wish to exclude from checking an SQLite database into your SVN. "Merging" database versions will likely prove to be quite difficult and is something your team should try to avoid. SVN Ignore is helpful for this as well. This may also be helpful for each developer to create a settings file that might be specific to their local machine (e.g. a Django directory location). Create a default settings file, check it in, then ignore a file that can override that so each developer can tailor their working copy to their own machine.
